> ## Documentation Index
> Fetch the complete documentation index at: https://docs.callhq.ai/llms.txt
> Use this file to discover all available pages before exploring further.
# Overview
> Learn how to create an AI voice assistant in CallHQ using the 4-step configuration process.
# Create a New Assistant
Creating a voice AI assistant in CallHQ is simple, powerful, and customizable. Whether you're building an agent for customer support, sales outreach, travel planning, or food ordering, CallHQ gives you full control over how your assistant behaves and sounds.
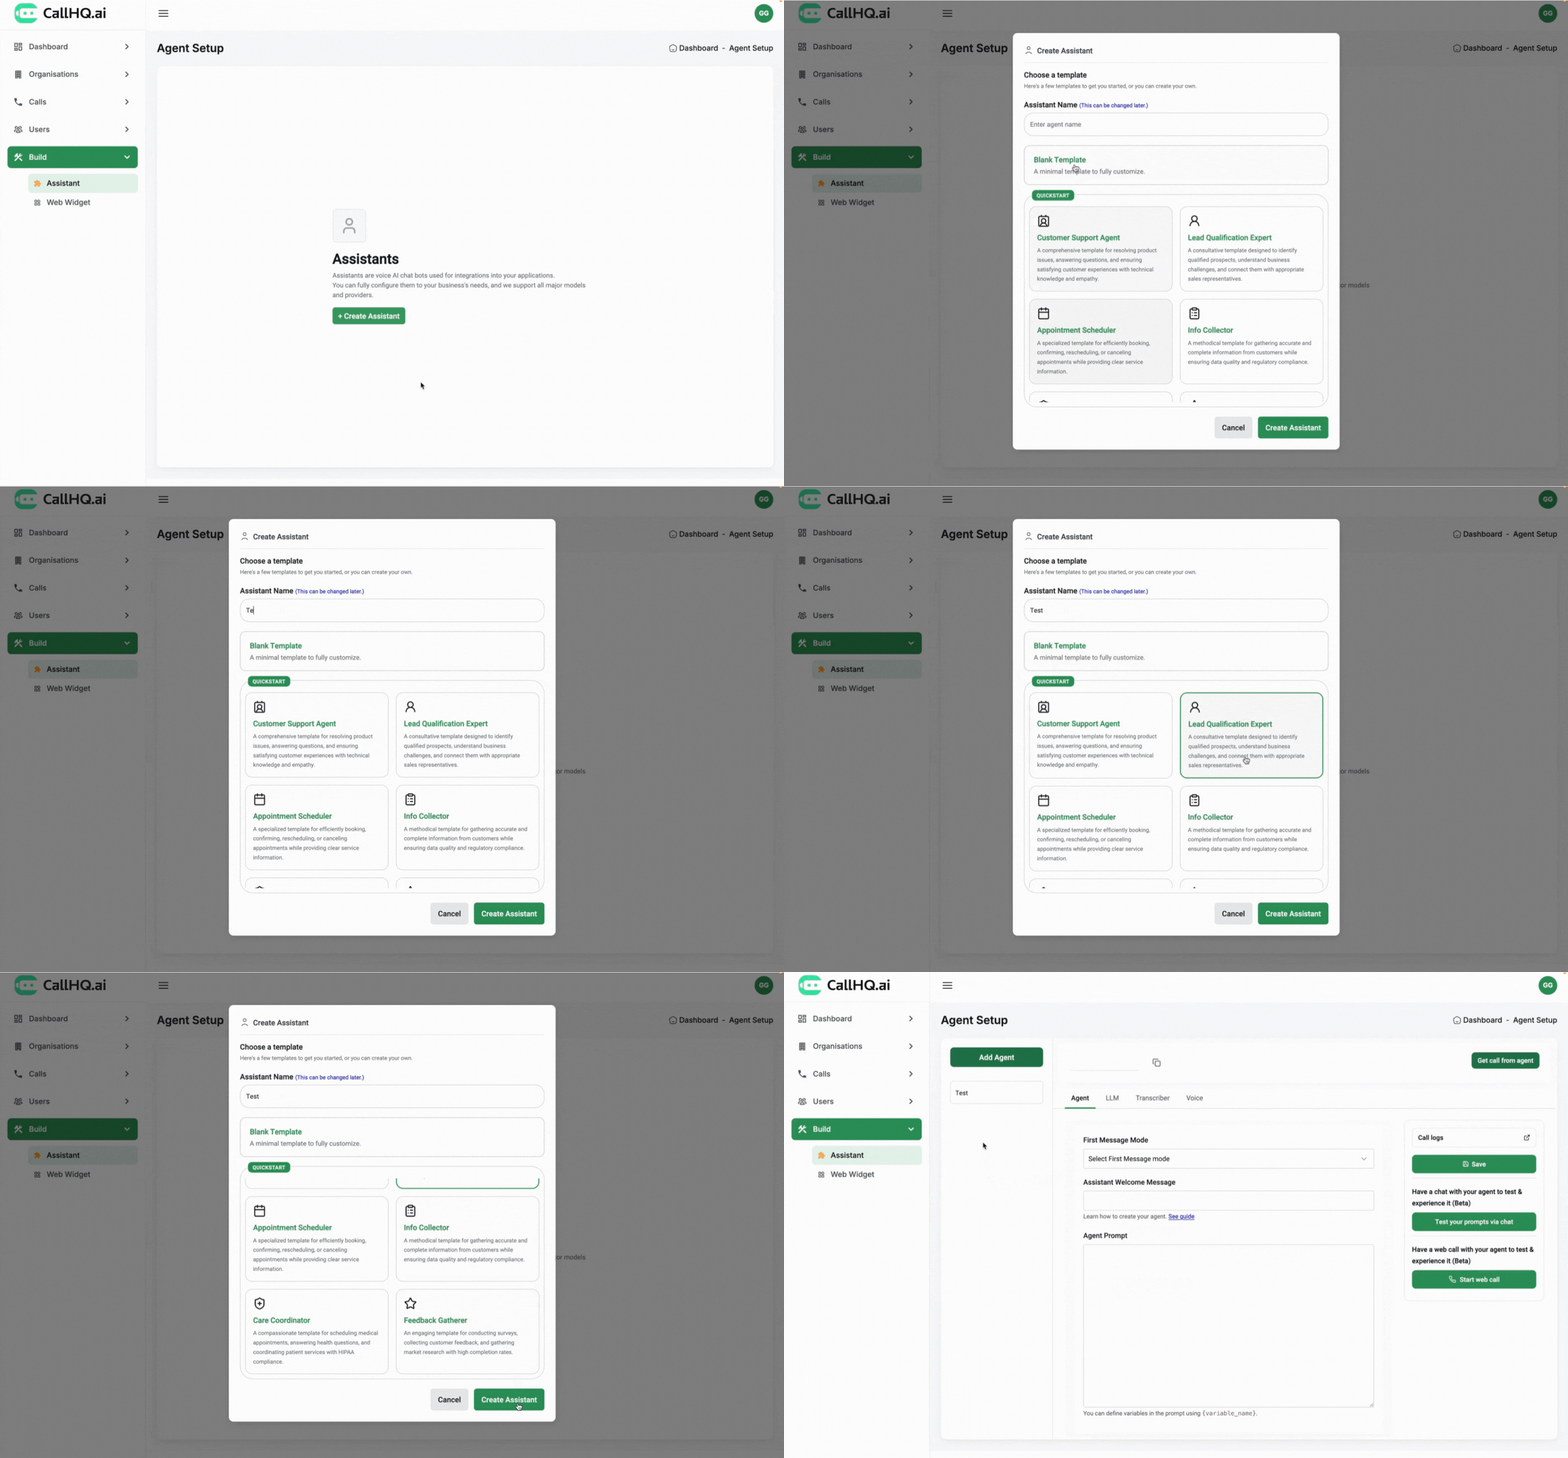
> Navigate to **Build → Assistant → Create Assistant** to get started.
 ***
## Create Assistant
After clicking **Create Assistant**, you will be prompted to:
* Enter an **Assistant Name** (you can change this later)
* Choose a starting point: either a **Blank Template** or one of six provided templates:
* Customer Support Agent
* Lead Qualification Expert
* Appointment Scheduler
* Info Collector
* Care Coordinator
* Feedback Gatherer
Each template includes preset prompts and guidance suited to specific use cases. Selecting a template helps you quickly configure an assistant for your needs, or you can start from scratch with the blank template.
***
## What You'll Configure
When you create a new assistant, you’ll be guided through **4 key configuration sections**:
1. **Agent** – Define the assistant’s identity, tone, and welcome message.
2. **LLM** – Choose the language model (e.g., GPT-4, Gemini) and tailor its behavior.
3. **Transcriber** – Select how speech is converted to text (STT).
4. **Voice** – Customize how your assistant sounds using TTS voices.
Each of these steps is critical to crafting a natural and effective voice interaction experience.
***
## Why These Four Sections?
| Section | Purpose |
| ------------------ | ------------------------------------------------------------------------ |
| **Agent** | Tells the assistant *who* it is, how to greet users, and how to respond. |
| **LLM** | Controls how the assistant *thinks* and understands the conversation. |
| **Transcriber** | Defines how voice input is converted to clean, accurate text. |
| **Voice** | Gives your assistant a *personality* through speech tone and style. |
| **Knowledge Base** | Provides domain-specific information for accurate, contextual responses. |
***
## Example: Travel Assistant
Let’s say you're building an assistant named **Riya** for a travel brand:
* **Welcome Message**: “Hi there! I’m Riya from Travel Agency. Can you tell me the destination you are looking at?”
* **Prompt Identity**: Female AI travel consultant helping with trip planning.
* **Style**: Friendly, courteous, uses English with some Hindi fillers.
* **Voice**: Indian English female voice from CallHQ’s voice library.
***
## Next Steps
Dive into the individual configuration steps to build your assistant:
* [Agent Configuration](./agent)
* [LLM Settings](./llm)
* [Transcriber Setup](./transcriber)
* [Voice Options](./voice)
* [Knowledge Base Integration](./knowledge-base)
Once all sections are configured, click **Save**, and you're ready to test your assistant via chat or web call!
***
> 💡 Pro Tip: Use the **“Test your prompts via chat”** button before going live to refine the assistant’s tone and flow.
***
## Create Assistant
After clicking **Create Assistant**, you will be prompted to:
* Enter an **Assistant Name** (you can change this later)
* Choose a starting point: either a **Blank Template** or one of six provided templates:
* Customer Support Agent
* Lead Qualification Expert
* Appointment Scheduler
* Info Collector
* Care Coordinator
* Feedback Gatherer
Each template includes preset prompts and guidance suited to specific use cases. Selecting a template helps you quickly configure an assistant for your needs, or you can start from scratch with the blank template.
***
## What You'll Configure
When you create a new assistant, you’ll be guided through **4 key configuration sections**:
1. **Agent** – Define the assistant’s identity, tone, and welcome message.
2. **LLM** – Choose the language model (e.g., GPT-4, Gemini) and tailor its behavior.
3. **Transcriber** – Select how speech is converted to text (STT).
4. **Voice** – Customize how your assistant sounds using TTS voices.
Each of these steps is critical to crafting a natural and effective voice interaction experience.
***
## Why These Four Sections?
| Section | Purpose |
| ------------------ | ------------------------------------------------------------------------ |
| **Agent** | Tells the assistant *who* it is, how to greet users, and how to respond. |
| **LLM** | Controls how the assistant *thinks* and understands the conversation. |
| **Transcriber** | Defines how voice input is converted to clean, accurate text. |
| **Voice** | Gives your assistant a *personality* through speech tone and style. |
| **Knowledge Base** | Provides domain-specific information for accurate, contextual responses. |
***
## Example: Travel Assistant
Let’s say you're building an assistant named **Riya** for a travel brand:
* **Welcome Message**: “Hi there! I’m Riya from Travel Agency. Can you tell me the destination you are looking at?”
* **Prompt Identity**: Female AI travel consultant helping with trip planning.
* **Style**: Friendly, courteous, uses English with some Hindi fillers.
* **Voice**: Indian English female voice from CallHQ’s voice library.
***
## Next Steps
Dive into the individual configuration steps to build your assistant:
* [Agent Configuration](./agent)
* [LLM Settings](./llm)
* [Transcriber Setup](./transcriber)
* [Voice Options](./voice)
* [Knowledge Base Integration](./knowledge-base)
Once all sections are configured, click **Save**, and you're ready to test your assistant via chat or web call!
***
> 💡 Pro Tip: Use the **“Test your prompts via chat”** button before going live to refine the assistant’s tone and flow.