> ## Documentation Index
> Fetch the complete documentation index at: https://docs.callhq.ai/llms.txt
> Use this file to discover all available pages before exploring further.
# Custom Function
> Connect CallHQ voice AI assistants to external APIs with custom function tools.
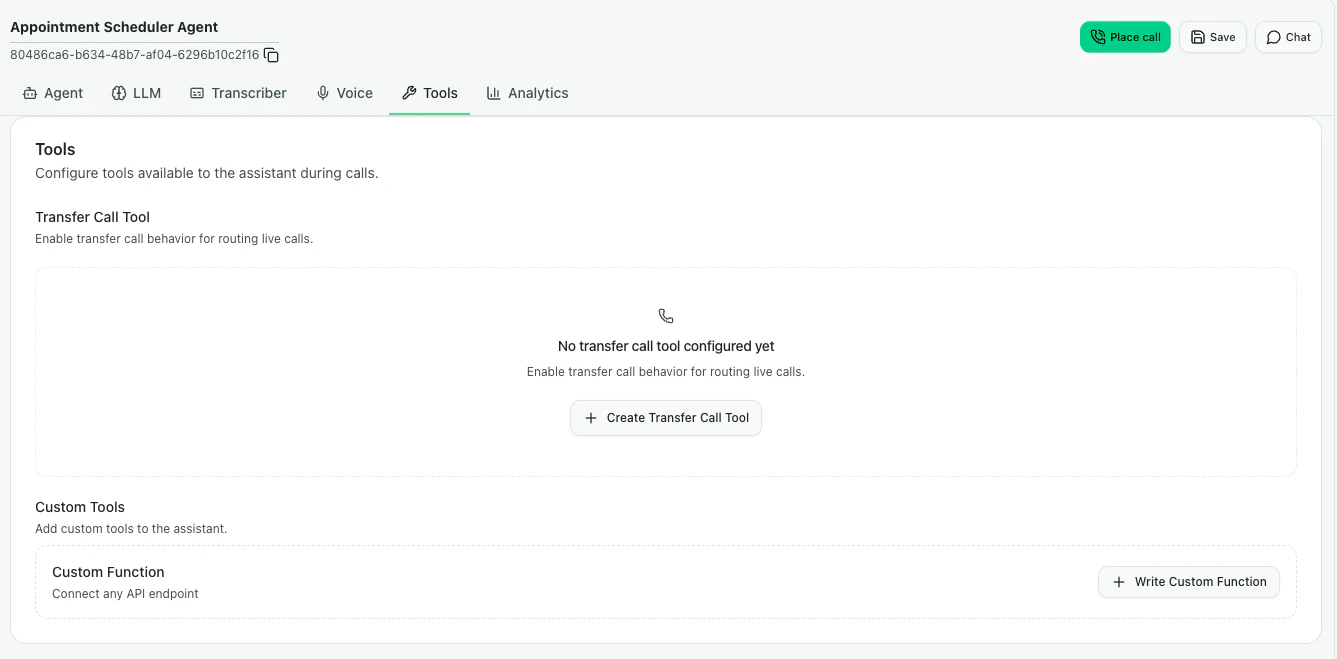
Custom Functions let your CallHQ voice AI assistant call your own API endpoints during live conversations. Use them when you need the assistant to fetch data, create records, trigger workflows, or send collected information to your backend.
To access this section:\
**Build → Assistant → Select Assistant → Tools → Custom Tools**
 ***
## What is a Custom Function?
A custom function is a tool definition that tells the assistant:
* What action the function performs
* When the assistant should call it
* Which parameters must be collected from the caller
* Which API endpoint CallHQ should request
* How the API response should be returned to the assistant
For example, you can create custom functions to look up an order, check account status, create a support ticket, submit a lead, or fetch appointment details from your system.
Custom Functions use the same function calling behavior described in [Function Calling](/assistant/function-calling).
***
## Create a Custom Function
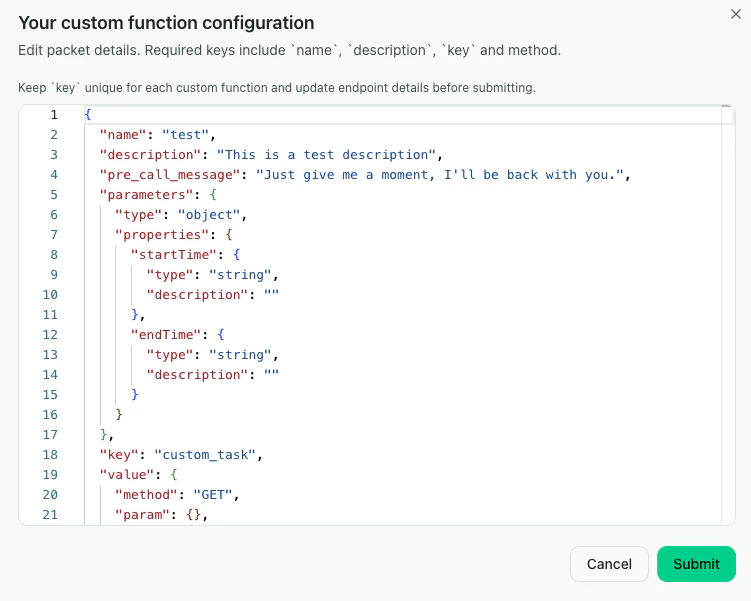
In the **Tools** tab, go to **Custom Tools** and click **Write Custom Function**. This opens the custom function configuration editor.
Add a clear function `name` and `description`. The assistant uses these fields to decide when the function should be called.
Define the information the assistant needs to collect from the caller before making the API request.
Set the request method, URL, headers, authentication details, and request body required by your API.
Save the tool, then test the assistant through chat, web call, or phone call to confirm the function triggers at the right time.
The fields `name`, `description`, `key`, and `method` are required. The `key` must be set to `custom_task`.
***
## What is a Custom Function?
A custom function is a tool definition that tells the assistant:
* What action the function performs
* When the assistant should call it
* Which parameters must be collected from the caller
* Which API endpoint CallHQ should request
* How the API response should be returned to the assistant
For example, you can create custom functions to look up an order, check account status, create a support ticket, submit a lead, or fetch appointment details from your system.
Custom Functions use the same function calling behavior described in [Function Calling](/assistant/function-calling).
***
## Create a Custom Function
In the **Tools** tab, go to **Custom Tools** and click **Write Custom Function**. This opens the custom function configuration editor.
Add a clear function `name` and `description`. The assistant uses these fields to decide when the function should be called.
Define the information the assistant needs to collect from the caller before making the API request.
Set the request method, URL, headers, authentication details, and request body required by your API.
Save the tool, then test the assistant through chat, web call, or phone call to confirm the function triggers at the right time.
The fields `name`, `description`, `key`, and `method` are required. The `key` must be set to `custom_task`.
 ***
## Example Schema
Use a schema like this as a starting point for a custom API integration:
```json theme={null}
{
"name": "create_support_ticket",
"description": "Create a support ticket when the caller reports an issue that needs follow-up from the support team.",
"pre_call_message": "One moment while I create a support ticket for you.",
"parameters": {
"type": "object",
"properties": {
"customer_name": {
"type": "string",
"description": "The caller's full name"
},
"issue_summary": {
"type": "string",
"description": "A short summary of the caller's issue"
}
},
"required": ["customer_name", "issue_summary"]
},
"key": "custom_task",
"value": {
"method": "POST",
"url": "https://api.example.com/support/tickets",
"headers": {
"Content-Type": "application/json",
"Authorization": "Bearer YOUR_API_KEY"
}
}
}
```
```json theme={null}
{
"name": "property_search",
"key": "custom_task",
"description": "Use this tool when the user wants to find nearby properties or properties in a specific location.",
"preCallMessage": "Just give me a moment, I'll fetch matching properties for you.",
"parameters": {
"type": "object",
"properties": {
"city": {
"type": "string",
"description": "City where the user wants to search for properties"
},
"latitude": {
"type": "number",
"description": "Latitude coordinate of the target location"
},
"longitude": {
"type": "number",
"description": "Longitude coordinate of the target location"
}
}
},
"value": {
"method": "POST",
"param": {},
"url": "https://your-api-domain.com/api/property-search",
"api_token": null,
"headers": {
"accept": "application/json",
"Content-Type": "application/json"
}
}
}
```
Replace the `url`, `headers`, parameters, and descriptions with the values required by your API.
***
## Using Context Variables
You can pass dynamic conversation values into custom function parameters or request configuration.
Common variables include:
* `{agent_id}` for the assistant ID
* `{call_sid}` for the call ID
* `{from_number}` for the caller's phone number
* `{to_number}` for the number that received the call
* Custom variables provided in the assistant prompt or call configuration
Learn more in [Variable Values](/assistants/dynamic-variables).
***
## Managing Custom Functions
After a custom function is added, it appears as a tool card in the **Tools** tab.
* Click the custom function card to review or update its configuration.
* Delete the tool when the assistant should no longer use that API.
* Re-test the assistant after every change to confirm the function still triggers correctly.
***
## Best Practices
* Use action-oriented function names like `create_support_ticket`, `check_order_status`, or `submit_lead`.
* Write descriptions that explain exactly when the assistant should call the function.
* Keep required parameters limited to information your API truly needs.
* Use `pre_call_message` when the API call may take a moment.
* Return concise API responses so the assistant can continue the conversation naturally.
* Test with realistic caller phrases, including incomplete or unclear information.
***
## Example Schema
Use a schema like this as a starting point for a custom API integration:
```json theme={null}
{
"name": "create_support_ticket",
"description": "Create a support ticket when the caller reports an issue that needs follow-up from the support team.",
"pre_call_message": "One moment while I create a support ticket for you.",
"parameters": {
"type": "object",
"properties": {
"customer_name": {
"type": "string",
"description": "The caller's full name"
},
"issue_summary": {
"type": "string",
"description": "A short summary of the caller's issue"
}
},
"required": ["customer_name", "issue_summary"]
},
"key": "custom_task",
"value": {
"method": "POST",
"url": "https://api.example.com/support/tickets",
"headers": {
"Content-Type": "application/json",
"Authorization": "Bearer YOUR_API_KEY"
}
}
}
```
```json theme={null}
{
"name": "property_search",
"key": "custom_task",
"description": "Use this tool when the user wants to find nearby properties or properties in a specific location.",
"preCallMessage": "Just give me a moment, I'll fetch matching properties for you.",
"parameters": {
"type": "object",
"properties": {
"city": {
"type": "string",
"description": "City where the user wants to search for properties"
},
"latitude": {
"type": "number",
"description": "Latitude coordinate of the target location"
},
"longitude": {
"type": "number",
"description": "Longitude coordinate of the target location"
}
}
},
"value": {
"method": "POST",
"param": {},
"url": "https://your-api-domain.com/api/property-search",
"api_token": null,
"headers": {
"accept": "application/json",
"Content-Type": "application/json"
}
}
}
```
Replace the `url`, `headers`, parameters, and descriptions with the values required by your API.
***
## Using Context Variables
You can pass dynamic conversation values into custom function parameters or request configuration.
Common variables include:
* `{agent_id}` for the assistant ID
* `{call_sid}` for the call ID
* `{from_number}` for the caller's phone number
* `{to_number}` for the number that received the call
* Custom variables provided in the assistant prompt or call configuration
Learn more in [Variable Values](/assistants/dynamic-variables).
***
## Managing Custom Functions
After a custom function is added, it appears as a tool card in the **Tools** tab.
* Click the custom function card to review or update its configuration.
* Delete the tool when the assistant should no longer use that API.
* Re-test the assistant after every change to confirm the function still triggers correctly.
***
## Best Practices
* Use action-oriented function names like `create_support_ticket`, `check_order_status`, or `submit_lead`.
* Write descriptions that explain exactly when the assistant should call the function.
* Keep required parameters limited to information your API truly needs.
* Use `pre_call_message` when the API call may take a moment.
* Return concise API responses so the assistant can continue the conversation naturally.
* Test with realistic caller phrases, including incomplete or unclear information.